Authorization code grant
The authorization code grant is described in the rfc 6749. The authorization code is obtained by using an authorization server as an intermediary between the client (the application in oauth2 vocabulary) and resource owner (the end user). Instead of requesting authorization directly from the resource owner, the client directs the resource owner to an authorization server, via its user-agent (a browser), which in turn directs the resource owner back to the client with the authorization code.
The flow is described in the following chart:
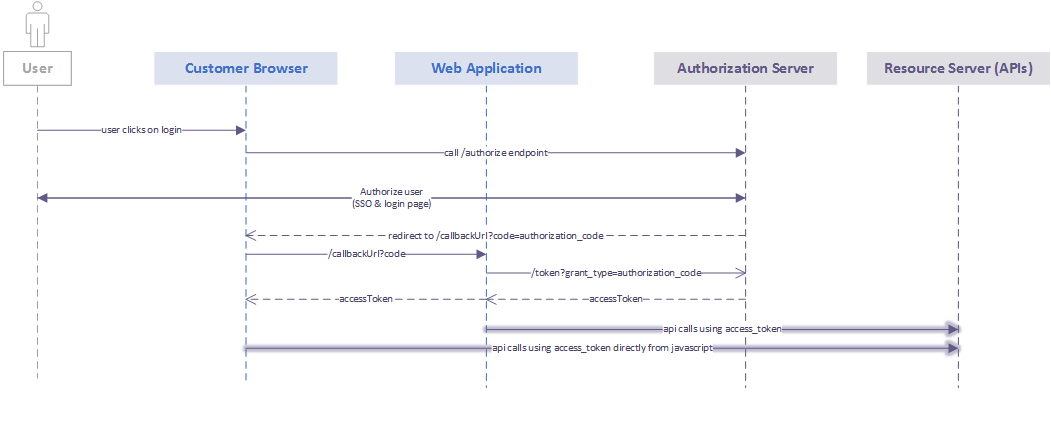
Step 1: Call /authorize endpoint
The first step is a call from the client application to the https://apis.axa-assistance.com/auth/v1/authorize endpoint.
Example call:
https://apis.axa-assistance.com/auth/v1/authorize?response_type=code&redirect_uri=https://apis.axa-assistance.com/oauthCallback&scope=urn:axa.assistance.travel.countries.read_only%20openid&state=state&client_id=b7f197f5Let’s take a look at the parameters involved:
- response_type=code: it indicates that we want to get an authorization_code as a response.
- redirect_uri=https://apis.axa-assistance.com/oauthCallback: it indicates the callback url. This URL has to be previously configured in the development portal for the client application (client_id).
- scope=urn:axa.assistance.travel.countries.read_only%20openid: these scopes specify the access rights that the resulting access_token must be granted. In this case, the application will only get access to read the list of countries. Another scope specified in this request is openid. This one is mandatory when using authorization_code grant.
- state=state: An opaque value used by the client to maintain state between the request and callback. This parameter optional. The parameter SHOULD be used for preventing cross-site request forgery.
- client_id=b7f197f5: Client application ID from the development portal.
Step 2: Login screen
At this point, a login screen should come up. Enter a valid username and password. For this example, use: johndoe/myComplexPsw!1
About the login screen: in case your application needs to customize this screen, there are different approaches that can be followed, depending on the scenario:
- For an internal axa-assistance trusted web application, it is possible redirect to an specific login screen hosted by the client website. The login screen will be required to have certain fields. The benefit of this approach is that the client application will have full control of its design. Since this application will have access to the user password, this is only possible with internal trusted applications.
- For external applications, a customization by the central team has to be requested.
About Single Sign On (SSO): in the context of signle sign on, if there is a session already started by another client, the login screen will not popup and the process will jump to the next step.
Step 3: Redirect to redirect_uri
Once the user identity was validated by the identity provider, the authorization server will redirect the user agent (the browser) to the redirect_uri specified in step 1.
Take a look at this callback example:
https://apis.axa-assistance.com/oauthCallback?code=0cafa1bc-c087-4880-a19d-104d54a63e3d&state=state&scope=urn%3Aaxa.assistance.travel.countries.read_only+openid- code=0cafa1bc-c087-4880-a19d-104d54a63e3d: this code will be used in the next step to exchange it for an access token.
- scope=urn%3Aaxa.assistance.travel.countries.read_only+openid: these are the scopes that were authorized by the authorization server. The token that will be generated in the next step will have this access rights.
- state=state: same parameter as the one sent in step one. At this point, the client app should validate this state to make sure that the request was genereted by the current session. This security validation is not mandatory, though it is higlhy recommended.
Step 4: Call the token endpoint
The final step to get an access token is the call to the /token endpoint to exchange the code received in the previous step for an access token. Keep this call server side, as the client_secret should remain a secret!
See the example below, in which the code obtained in step 3 is used to get an access token:
curl -X POST -H "Authorization: Basic YjdmMTk3ZjU6ODQ2NDk3NDNiZTYyYTQyZTBhNzJlMWFmZDNhODhiODM=" -H "Content-Type: application/x-www-form-urlencoded" -d 'grant_type=authorization_code&code=0cafa1bc-c087-4880-a19d-104d54a63e3d&redirect_uri=https://apis.axa-assistance.com/oauthCallback' "https://apis.axa-assistance.com/auth/v1/token"- Authorization header: http basic authentication header, using the client id and client secret that was registered for that client in the development portal. In this example: Basic base64Encoding(b7f197f5:84649743be62a42e0a72e1afd3a88b83).
- Content-Type: application/x-www-form-urlencoded: Use this content type header that specifies the format of the following parameters in the body.
- grant_type=authorization_code: Indicates that the authorization_code grant type is being used.
- code=0cafa1bc-c087-4880-a19d-104d54a63e3d: The authorization code obtained in step 3.
- redirect_uri=https://apis.axa-assistance.com/oauthCallback: Redirect_uri specified in step 1. If a different uri is specified, the call will fail.
Step 5: Use the APIs!
After calling the token endpoint in step 5, you will get a response with the following format:
{
  "access_token": "eyJ0eXAi...",
  "token_type": "Bearer",
  "expires_in": 3600,
  "refresh_token": "eyJ0eXAiOiJKV1QiLC...",
  "scope": "urn:axa.assistance.travel.countries.read_only openid",
  "id_token": "eyJ0eXAiOiJKV1QiLCJhb...",
  "id_token_type": "urn:ietf:params:oauth:grant-type:jwt-bearer"
}
The access_token value is the one that will grant access to the apis. It’s actually a JWT. This token can be used to call the apis that are authorized by the scopes that this token was granted. You can find these scopes in the “scope” field in the response.
Let’s take a look at this jwt example.
It’s divided in 3 segments split by a “.”:
- The first segment of the JWT contains the information regarding the signing algorithm.
- The second segment contains the token information. There you will find the username in sub.value. As a unique ID to identify a user, we strongly suggest to use: customData.cn.
This access token can be safetly used from both server side or from javascript. To use it, you just need to add it to the authorization header using it as a bearer token.
- The third segment contains the signature of the first and the second segment using the signing algorithm. The signature should always be verified to ensure that the data have not been tampered.
Example call:
curl -X GET -H "Content-Type: application/json" -H "Authorization: Bearer eyJ0eXAiOiJKV1QiLCJhb......GciOiJSUzI1N" "https://apis.axa-assistance.com/travel/v1/countries"