Client Credentials grant
Foreword
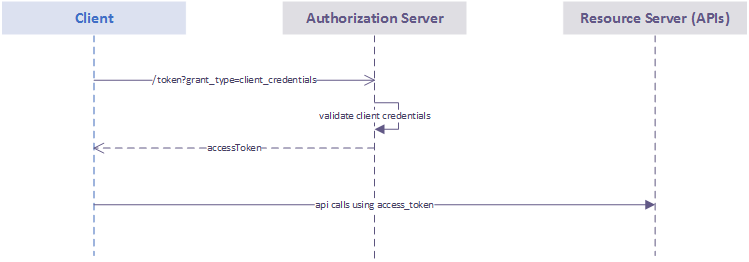
The client credentials code grant is described in the RFC 6749. This grant can be used when the authorization scope is limited to the protected resources under the control of the Client (an application in OAuth2 vocabulary), or to protected resources previously arranged with the Authorization Server. Client credentials are used as an authorization grant typically when the Client is acting on its own behalf (the Client is also the resource owner) or is requesting access to protected resources based on an authorization previously arranged with the Authorization Server.
The flow is described in the following chart:
Retrieve a JSON Web Token (JWT)
Request for a JWT
The first step is a call from the Client application to the Authorization Server. Depending on the environment to be called, this can be done through:
- https://auth-stg.api.axapartners.com/oauth/token for the staging;
- https://auth.api.axapartners.com/oauth/token for the production.
Just below, you can find an example of cURL request that can be used in order to retrieve the said token for the production environment with the two following scopes:
- urn:axa.partners.assistance.home.cases.read_only
- urn:axa.partners.assistance.home.waterdamage.declarations.write
curl -X POST \
  https://auth.api.axapartners.com/oauth/token \
  -H 'authorization: Basic Y2xpZW50X2lkOmNsaWVudF9zZWNyZXQ=' \
  -H 'content-type: application/x-www-form-urlencoded' \
  -d 'grant_type=client_credentials&scope=urn:axa.partners.assistance.home.cases.read_only urn:axa.partners.assistance.home.waterdamage.declarations.write'
To have a better understanding of the parameters involved here, let’s review them:
- authorization: Basic Y2xpZW50X2lkOmNsaWVudF9zZWNyZXQ= encloses your
client_idandclient_secretseparated with a colon and encoded in base64;
- content-type: application/x-www-form-urlencoded indicates that the application/x-www-form-urlencoded format with a character encoding of UTF-8 in the HTTP request entity-body will be use;
- grant_type=client_credentials indicates that the client credentials grant type is being used;
- scope=urn:axa.partners.assistance.home.cases.read_only urn:axa.partners.assistance.home.waterdamage.declarations.write specifies the access rights that the resulting access_token must be granted. In this case, the application will get access to read the list of home cases and create a water damage declaration. Additional scopes can be specified, and (like in the sample) must be separated by a white space.
As an API consumer you need to have ONE Application (Credentials) for each environment, this mean that you’ll have to manage two client_id and client_secret (and requests scope grant for each) if you do want to use the production and staging environment.
Finaly, when you want to consume a new API, please send us an email at api.move@axa-assistance.com with subject “MOVE scope request” and with the URL of the API you’d like to consume and your client_id.
Find the JWT in the response
If the access token request is valid and authorized, the Authorization Server will issue an access token. An example of a successful response:
{
  "access_token":"eyJhbGci...kbAV0KeeM",
  "token_type":"Bearer",
  "expires_in":3600,
  "scope":"urn:axa.partners.assistance.home.cases.read_only urn:axa.partners.assistance.home.waterdamage.declarations.write"
}
The access_token value is the one that will grant access to the APIs. It’s actually the JWT. This token can be used to call the APIs that are authorized by the scopes that this token was granted.
Let’s take a look at this JWT example.
It’s divided in 3 segments split by a “.”:
- The first segment of the JWT contains the information regarding the signing algorithm.
- The second segment contains the token information. There you will find the
client_idand other information on the Authorization Server.
- The third segment contains the signature of the first and the second segment using the signing algorithm. The signature should always be verified to ensure that the data have not been tampered.
Call an API with the JWT
Now that you have your token you can make your endpoint request. Here is an example of a GET Request including the Token
curl -X GET \
  "https://apis.axa-assistance.com/assistance/v2/home/cases" \
  -H "Content-Type: application/json" \
  -H "Authorization: Bearer eyJhbGci...kbAV0KeeM"
This request can directly be included in an API development tool such as Postman or Insomnia to test it and also get code sample in different programming languages (Python, C#, …).
N.B. Please note that only stable version (vN such as the v2 in the cURL sample) are meant to be used in production. The experimental ones (with vexp in the path) are going to move in stable version once the testing phase ends and you must update your Front-End configuration to get to production.
A JavaScript Code Sample
Here is an example, in JavaScript, of how you can implement the token generation on your Front-End Application.
const { Issuer } = require('openid-client');
var request = require('request');
// Function returning a token using openid discovery
// client_id and client_secret needs to be filled
// Grant type defaulting to 'client_credentials'
// Correct scopes need to be provided
async function getToken() {
  Issuer.defaultHttpOptions.timeout = 10000;
  const auth0Auth = await Issuer.discover('https://auth.api.axapartners.com//.well-known/openid-configuration');
  const client = await new auth0Auth.Client({
    client_id: 'client_id',
    client_secret: 'client_secret'
  });
  const token = await client.grant({
    grant_type: 'client_credentials',
    scope: 'urn:scope_1 urn:scope_2'
  });
  return token;
}
async function main() {
  const token = await getToken();
  // Need to provide a valid URL and HTTP method
  var options = {
    method: 'GET',
    url: 'https://my_api/getsomething',
    headers:
    {
      Authorization: `${token.token_type} ${token.access_token}`
    }
  };
  request(options, function (error, response, body) {
    if (error)
      throw new Error(error);
    console.log(body);
    console.log(response.body);
  });
}
main();